

How to Create an XML Sitemap & Submit It to Google Search Console (2026 Guide)
A sitemap is one of the most important parts of technical SEO. If you own a website, creating an XML sitemap and submitting it to Google Search Console helps search engines discover your pages faster and crawl your website more efficiently.
In this guide, you’ll learn:
- What a sitemap is
- Types of sitemaps
- Why XML sitemaps are important for SEO
- How to create a sitemap in WordPress
- How to submit your sitemap to Google Search Console
Let’s get started.
What is a Sitemap?
A sitemap is a file that contains a list of all the important URLs on your website.
It helps search engines understand:
- Your website structure
- Which pages exist
- Which pages are newly added
- Which pages were recently updated
Instead of Google discovering every page manually, a sitemap gives Google a roadmap of your website.
Types of Sitemap
There are mainly two types of sitemaps.
1. XML Sitemap
An XML sitemap is designed specifically for search engines like Google and Bing.
It contains URLs that search engine bots can crawl and index.
XML Sitemap Benefits
- Helps Google discover new pages faster
- Improves website crawling
- Makes indexing quicker
- Shows your website structure
- Useful for large websites
Example:
yourwebsite.com/sitemap.xml2. HTML Sitemap
An HTML sitemap is created for website visitors, not search engines.
It displays your important pages in a simple list so users can easily navigate your website.
Although HTML sitemaps were more common in the past, most modern websites no longer use them because navigation menus have become much better.
Why Do You Need an XML Sitemap?
Many beginners ask,
“If Google can crawl my website, why do I need a sitemap?”
The answer is simple.
An XML sitemap makes Google’s job much easier.
Here are the biggest advantages.
1. Faster Page Discovery
Whenever you publish a new blog post or page, Google can find it much faster through your sitemap.
2. Better Crawling
Instead of searching your entire website randomly, Google gets all important URLs from one file.
This improves crawling efficiency.
3. Helps SEO
A sitemap itself is not a ranking factor, but it helps Google discover and index your pages properly.
Better indexing means your pages have a better chance of appearing in search results.
4. Shows Website Structure
A sitemap clearly tells Google how your website is organized.
For example:
- Homepage
- Blog Posts
- Categories
- Pages
- Tags (optional)
How to Create an XML Sitemap in WordPress
Creating a sitemap is very easy if you’re using WordPress.
There are two common methods.
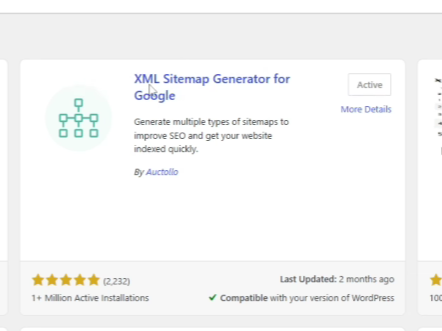
Method 1: XML Sitemap Generator Plugin
Go to
Dashboard → Plugins → Add New
Search for:
XML Sitemap Generator for Google
Install and activate the plugin.
After activation, open the plugin settings.
Here you can choose what should appear inside your sitemap.
For example:
- Homepage
- Posts
- Pages
- Categories
- Tags
- Custom Post Types
- Static Pages
You can also:
- Exclude specific posts
- Exclude categories
- Set crawl priority
- Include last modified date
- Configure update frequency
Important Setting
Make sure Last Modified Date is enabled.
This helps search engines know when a page has been updated.
Method 2: Use Yoast SEO (Recommended)
If you’re already using Yoast SEO, you don’t need a separate sitemap plugin.

Yoast automatically creates your XML sitemap.
Simply install and activate Yoast SEO.
That’s it.
No manual configuration is required.
How to Find Your Sitemap
After activating Yoast SEO, simply visit:
yourwebsite.com/sitemap.xmlor
yourwebsite.com/sitemap_index.xmlYou’ll see multiple sitemap files, such as:
- Post Sitemap
- Page Sitemap
- Category Sitemap
- Author Sitemap
- Tag Sitemap (if enabled)
Each sitemap contains URLs from that specific section.
For example:
Post Sitemap
Contains all blog posts.
Page Sitemap
Contains About, Contact, Privacy Policy, and other pages.
Category Sitemap
Contains all category archive pages.
How to Submit Sitemap to Google Search Console
Once your sitemap is ready, the next step is submitting it to Google.
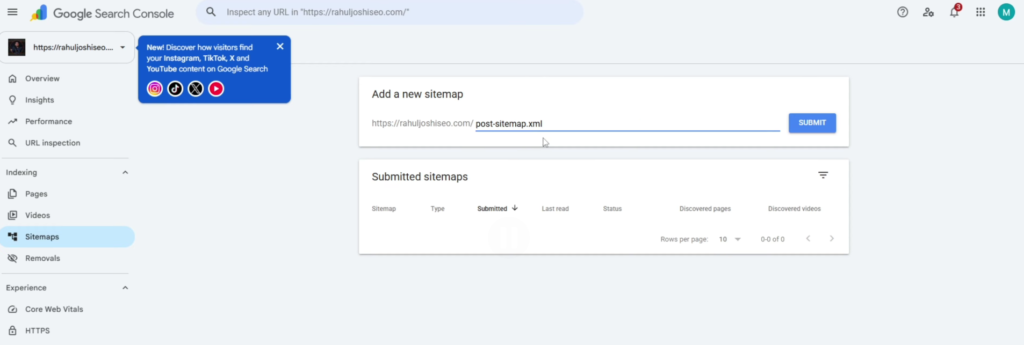
Step 1
Open Google Search Console.
Select your website property.
Step 2
Click on
Indexing → Sitemaps
Step 3
In the Add a New Sitemap field, enter your sitemap URL.
For example:
sitemap.xmlor
sitemap_index.xmlThen click Submit.
Step 4
Google will process your sitemap.
If everything is correct, you’ll see:
- Submitted Successfully
- Number of discovered URLs
- Last Read Date
- Status.
You can also refer to my Youtube for in depth understanding..
What Happens After Submission?
Once submitted, Google automatically checks your sitemap regularly.
Whenever you:
- Publish a new blog
- Create a new page
- Update an old article
Your sitemap gets updated automatically (if you’re using Yoast SEO or a similar plugin).
Google can then quickly detect these changes and crawl your updated content.
Common Sitemap Mistakes to Avoid
Many beginners make these mistakes:
- Installing multiple sitemap plugins at the same time
- Blocking the sitemap in robots.txt
- Submitting the wrong sitemap URL
- Forgetting to submit the sitemap in Search Console
- Including unnecessary pages that shouldn’t be indexed
Using a single SEO plugin like Yoast SEO is usually the easiest and safest option.
Best Practices
Follow these simple tips for better results:
- Keep your sitemap updated automatically.
- Include only indexable pages.
- Remove deleted URLs from your sitemap.
- Enable the Last Modified Date.
- Submit your sitemap to Google Search Console after creating it.
- Check Search Console regularly for sitemap errors.
Final Thoughts
An XML sitemap is a simple but essential part of technical SEO. It helps Google understand your website structure, discover new content faster, and crawl your pages more efficiently.
If you’re using WordPress, tools like Yoast SEO can generate and update your sitemap automatically, making the process almost effortless.
After creating your sitemap, don’t forget to submit it in Google Search Console. It’s a one-time setup that can help ensure your content gets discovered and indexed more effectively.